You absolutely must have the perfect setup for your home office mic to achieve professional-level audio quality. Mastering the art of mic setup is crucial for creating a top-notch recording environment.
To help you achieve this, we've compiled 7 essential tips that will elevate your home office mic setup game. From selecting the right microphone to optimizing your recording space, these tips will ensure that your audio recordings are nothing short of exceptional.
So, let's dive into these must-have tips and take your home office mic setup to the next level!
Key Takeaways
- Consider your budget when selecting a microphone.
- Assess the acoustics and layout of your workspace.
- Use a pop filter or windscreen to reduce unwanted sounds and improve clarity.
- Place the microphone 6-12 inches from your mouth for optimal sound quality.
Choose the Right Microphone
When setting up your home office mic, it's essential to choose the right microphone that suits your specific needs and workspace. The first step in microphone selection is to consider your budget. Quality microphones come in a wide range of prices, so it's important to establish how much you're willing to spend. Keep in mind that a higher budget often results in better sound quality and durability.
Next, you should understand the different microphone types, such as condenser and dynamic. Condenser microphones are more sensitive and capture a broader range of frequencies, making them ideal for capturing detailed vocals and acoustic instruments. On the other hand, dynamic microphones are more rugged and can handle high sound pressure levels, making them suitable for recording amplified instruments and loud vocals.
Consider the specific demands of your home office setup when making this decision. If you'll be working in a quiet environment and need to capture clear, detailed audio, a condenser microphone might be the best choice. However, if you anticipate working in a louder environment or recording amplified instruments, a dynamic microphone could be more suitable.
Always remember to balance your budget with the type of microphone that will best serve your needs.
Optimize Your Recording Space
To optimize your recording space for the home office mic setup, there are a few key steps to follow.
First, assess the acoustics and layout of your workspace. Look for any sources of noise, such as air vents, appliances, or outside traffic, and try to minimize their impact on your recordings. Consider using soundproofing tips, such as heavy curtains, acoustic panels, or even DIY solutions like hanging thick blankets to absorb sound reflections.
Next, evaluate the layout of your workspace. Position your desk and microphone away from walls to reduce unwanted reflections. Experiment with different furniture arrangements to find the best setup for capturing clear and natural sound. If possible, choose a room with carpeting or add a rug to help absorb sound and minimize reverberations.
Additionally, consider investing in a reflection filter to help isolate your microphone from room reflections. These portable devices can be easily attached to your microphone stand and are especially useful for recording in untreated rooms.
Use a Pop Filter or Windscreen
You can significantly reduce plosive sounds with a pop filter or windscreen, making your audio sound clearer and more professional.
These accessories help enhance the quality of your recordings by minimizing unwanted noise and distortion caused by strong gusts of air.
Reduce Plosive Sounds Effectively
Minimize plosive sounds effectively with a pop filter or windscreen to enhance the quality of your home office audio recordings. Plosive sounds, such as 'p' and 'b' sounds, can cause unwanted bursts of air that disrupt the clarity of your recordings.
To effectively reduce plosive sounds, consider the following techniques:
- Position the pop filter or windscreen about two inches from the microphone to create a barrier against plosive sounds.
- Use a double-layered pop filter for added protection against strong plosives.
- Angle the pop filter or windscreen slightly off-axis to the microphone to further minimize plosive impact.
- Regularly clean and maintain your pop filter or windscreen to ensure optimal effectiveness.
- Experiment with different pop filter or windscreen placements to find the best position for reducing plosive sounds without compromising audio quality.
Enhance Audio Quality
Enhance your audio quality by using a pop filter or windscreen to reduce unwanted sounds and improve clarity in your home office recordings. When selecting a pop filter, consider a double-layered nylon mesh design to effectively minimize plosive sounds.
Alternatively, opt for a foam windscreen to attenuate breath noises and reduce the impact of air movement on the microphone.
To further enhance audio quality, explore different audio interface options to ensure seamless connectivity and high-quality sound transmission.
Additionally, implement soundproofing techniques such as acoustic panels or bass traps to minimize external noise interference, resulting in cleaner recordings.
Minimize Unwanted Noise
To effectively minimize unwanted noise and improve audio clarity in your home office recordings, consider incorporating a pop filter or windscreen into your mic setup. Additionally, using a pop filter or windscreen consistently can significantly reduce plosive sounds and breath noises.
When it comes to soundproofing solutions, a pop filter or windscreen can make a substantial difference. Here are some essential tips to minimize unwanted noise:
- Position the pop filter or windscreen correctly to intercept plosive sounds.
- Choose a high-quality pop filter or windscreen for better noise canceling technology.
- Maintain a consistent distance between your mouth and the pop filter or windscreen.
- Regularly clean and maintain your pop filter or windscreen to ensure optimal performance.
- Experiment with different pop filter or windscreen placements to find the most effective setup for your recording environment.
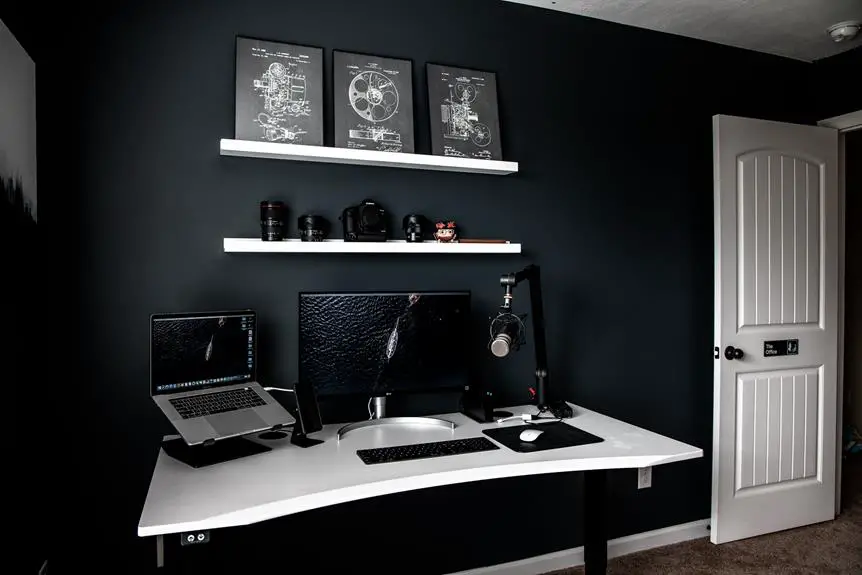
Position Your Microphone Correctly
You can significantly improve your audio quality by positioning your microphone correctly.
Placing the microphone at the ideal distance and angle from your mouth can help minimize background noise and enhance sound quality.
Testing different positions and settings will ensure that you find the optimal setup for your home office mic.
Ideal Microphone Placement
Position your microphone at a distance of 6-12 inches from your mouth for optimal sound quality during recordings or online meetings. This placement ensures that your voice is captured clearly without picking up excessive background noise. When setting up your microphone, consider the following tips for ideal placement:
- Minimize Sound Absorption: Avoid placing the microphone too close to surfaces that absorb sound, such as thick curtains or upholstered furniture.
- Maximize Sound Reflection: Position the microphone in a way that allows it to capture reflected sounds from hard surfaces, such as walls or ceilings, to enhance the audio quality.
- Avoid Obstacles: Ensure that there are no obstructions between you and the microphone to prevent muffled or distorted sound.
- Maintain Consistency: Keep the microphone at a consistent distance from your mouth to maintain a steady sound level.
- Test Different Positions: Experiment with various placements to find the optimal position that captures your voice with clarity and minimal interference.
Minimizing Background Noise
When setting up your microphone for ideal placement, ensure that it is positioned to minimize background noise, allowing for clear sound capture. To effectively minimize background noise, consider implementing soundproofing solutions and noise cancellation techniques. Here's a table summarizing some effective options:
| Soundproofing Solutions | Noise Cancellation Techniques | Additional Tips |
|---|---|---|
| Acoustic panels | Directional microphones | Use a pop filter |
| Bass traps | Noise reduction software | Opt for a cardioid mic |
| Weatherstripping | Noise isolation shields | Control room reflections |
Testing Sound Quality
To accurately assess the sound quality, frequently test your microphone positioning during recording sessions in your home office. Proper placement is essential for capturing clear and balanced audio. Here are some tips to help you ensure optimal sound quality:
- Distance: Maintain a consistent distance between your mouth and the microphone to achieve a balanced sound level.
- Angles: Experiment with different angles to find the best position for capturing your voice without picking up unnecessary background noise.
- Testing Equipment: Use high-quality headphones to monitor and assess the sound quality during recording.
- Room Acoustics: Pay attention to the acoustics of your home office and make adjustments to minimize reverberations and echoes.
- Troubleshooting Issues: Regularly check for any technical issues with your microphone or recording setup to address them promptly.
Set Up Proper Monitoring
Ensure that you have a high-quality pair of headphones for accurate monitoring of your audio recordings. Proper soundproofing is essential for your home office setup. It helps in reducing external noise interference and ensures that you can clearly hear the nuances in your recordings.
When setting up your monitoring levels and volume, it's crucial to find the right balance. You want to be able to hear all the details without straining your ears or causing any distortion. Start by setting your volume at a comfortable level, then adjust it as needed while recording or mixing.
Pay attention to the dynamics of your audio and make sure that your headphones can accurately reproduce the full range of frequencies. This will help you make informed decisions about your recordings and ensure that they sound great on any playback system.
Consider Acoustic Treatment
Invest in acoustic treatment materials to optimize the sound quality in your home office, providing a controlled environment for your recordings. Proper acoustic treatment can make a significant difference in the quality of your recordings. Here are some soundproofing tips and microphone selection-based pointers to enhance your recording environment:
- Bass Traps: Install bass traps in the corners of your room to absorb low-frequency sound waves and reduce bass build-up.
- Diffusers: Use diffusers to scatter sound reflections, creating a more balanced and natural acoustic environment.
- Absorption Panels: Place absorption panels strategically on walls and ceilings to minimize echoes and reverberations.
- Reflection Filters: Consider using reflection filters behind your microphone to reduce room reflections and capture a cleaner sound.
- Microphone Isolation Shield: Invest in a microphone isolation shield to minimize external noise and focus the microphone on the intended sound source.
Test and Adjust Your Settings
Once you have implemented acoustic treatment in your home office, test and adjust your microphone settings to ensure optimal sound quality for your recordings. Start by adjusting levels to find the perfect balance between your voice and background noise. Utilize soundproofing solutions such as carpets, curtains, or acoustic panels to minimize external disturbances. Additionally, consider the following tips to fine-tune your microphone setup:
| Microphone Positioning | Pop Filter Usage | Test Recordings |
|---|---|---|
| Position the microphone at a distance of about 6-8 inches from your mouth to capture clear, natural sound. | Use a pop filter to reduce plosive sounds and sibilance, resulting in cleaner recordings. | Record short test clips and listen back to identify any issues with background noise, echo, or distortion. Make adjustments as necessary. |
Frequently Asked Questions
What Are the Best Ways to Reduce Background Noise in a Home Office Mic Setup?
To reduce background noise in your home office mic setup, use noise cancellation and soundproofing techniques. Place acoustic panels on walls, use a directional microphone, and position it close to your mouth. Eliminate ambient sounds for a clearer audio recording.
How Can I Prevent Echo and Reverberation in My Recordings?
To prevent echo and reverberation in your recordings, focus on acoustic treatment and soundproofing. Carefully consider microphone positioning and room layout to minimize these issues. These steps will enhance the quality of your recordings.
Are There Any Specific Tips for Using a Microphone With a Laptop or Desktop Computer?
When using an external microphone with your laptop, ensure compatibility by checking the connection type. USB microphones are usually plug-and-play, while XLR mics may require an audio interface. Adjust your laptop's settings for optimal performance.
What Are Some Common Mistakes to Avoid When Positioning a Microphone in a Home Office Setup?
When positioning your microphone in a home office setup, common mistakes include placing it too far or too close, leading to inconsistent audio. Proper positioning is crucial for effective noise reduction techniques and optimal sound quality.
How Can I Improve the Sound Quality of My Recordings Without Investing in Expensive Equipment?
To improve vocal clarity without spending on pricey gear, adjust microphone settings. Play with distance and angle. Eliminate background noise. Experiment with pop filters and foam windscreens. Practice and tweak until you find the sweet spot.