DIY acoustic panels can transform your workspace into a quieter haven by absorbing sound and reducing distractions. To make your own, gather materials like acoustic foam, a sturdy wooden frame, and breathable fabric. Cut the wood, assemble the frame, and wrap the foam in fabric. Proper placement of these panels can enhance effectiveness. Don't forget to choose fabrics that match your decor for added aesthetics. Stay tuned for more tips on optimizing your workspace noise control.
Key Takeaways
- Use acoustic foam or mineral wool to absorb sound, significantly reducing echoes and distractions in your workspace.
- Build sturdy wooden frames to support the acoustic materials, ensuring they fit your desired dimensions for maximum effectiveness.
- Wrap acoustic panels in breathable fabric like burlap or cotton to enhance aesthetics while maintaining sound absorption capabilities.
- Hang the panels strategically on walls or ceilings using brackets or adhesive strips to optimize soundproofing throughout the room.
- Combine DIY acoustic panels with other soundproofing solutions, such as weatherstripping and soundproof curtains, for improved noise reduction.
Understanding the Importance of Acoustic Panels

When you want to create a comfortable and focused space, understanding the importance of acoustic panels is essential.
These panels help absorb sound, reducing echoes and distractions in your environment. By controlling noise levels, you'll find it easier to concentrate, whether you're working, studying, or enjoying leisure activities.
Acoustic panels can also enhance the overall aesthetics of your room, offering a stylish way to improve sound quality. You'll appreciate the difference in clarity and comfort as you engage in conversations or listen to music.
Acoustic panels not only improve sound quality but also add a stylish touch to your space, enhancing clarity and comfort.
Additionally, effective sound management can lead to better productivity and reduced stress, making your workspace more enjoyable.
Investing in acoustic panels is a smart move for anyone who values a peaceful and efficient environment.
Materials Needed for DIY Acoustic Panels
To create your own DIY acoustic panels, you'll need a few specific materials that are both effective and easy to source.
First, get some acoustic foam or mineral wool, which will absorb sound effectively. You'll also need a sturdy wooden frame to hold the acoustic material; plywood works well for this.
Don't forget fabric to wrap around the panels—choose something breathable like burlap or cotton to allow sound absorption.
For assembly, grab a staple gun, scissors, and a measuring tape. If you'd like to hang the panels, consider using wall brackets or adhesive strips.
These materials will help you build panels that not only look good but also greatly reduce noise in your workspace.
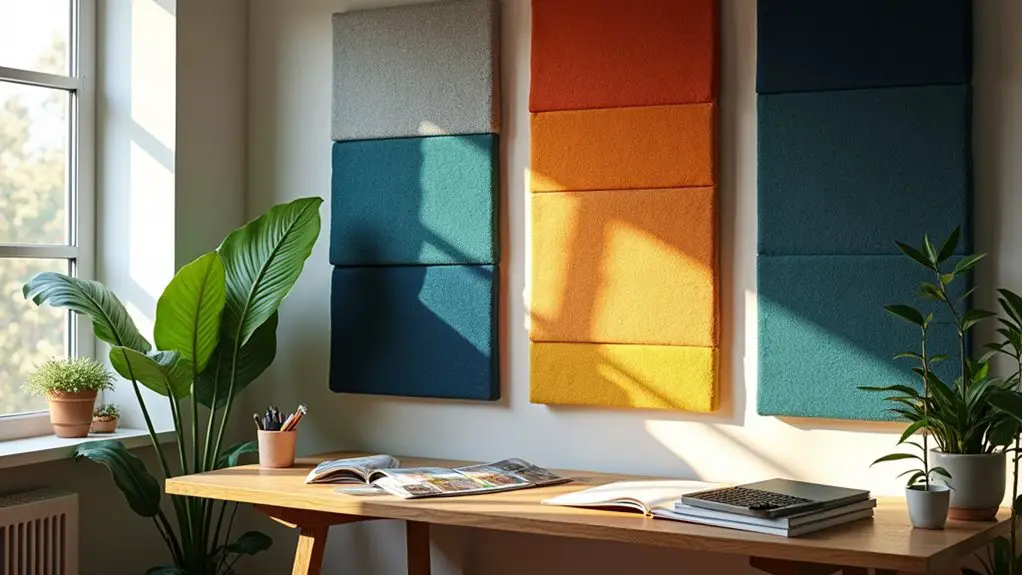
Designing Your Acoustic Panels

Designing your acoustic panels starts with considering their size and shape, as these factors can greatly impact their effectiveness.
Think about the dimensions of your workspace and the areas where sound absorption is most needed. Larger panels cover more surface area, while smaller ones can be strategically placed for targeted sound control.
Consider your workspace dimensions; larger panels offer broader coverage, while smaller ones allow for focused sound control.
Next, consider the shape—rectangular panels are common, but you can experiment with squares or even custom shapes to match your decor.
Keep in mind that unevenly shaped panels can enhance aesthetics and create a unique look.
Lastly, choose colors and fabrics that blend well with your workspace. This way, your acoustic panels won't just reduce noise; they'll also enhance your office's visual appeal.
Step-by-Step Guide to Building Acoustic Panels
Building your own acoustic panels can be a rewarding project that enhances both sound quality and aesthetics in your space.
Start by gathering materials: you'll need wood frames, acoustic foam or insulation, fabric of your choice, and basic tools like a staple gun and scissors.
Cut the wood to your desired dimensions and assemble the frames. Next, measure and cut the acoustic foam to fit snugly inside the frames.
Once that's done, wrap the foam in the fabric, ensuring it looks neat, and secure it with the staple gun.
Finally, place the panels on the wall or ceiling using adhesive or brackets.
With just a little effort, you'll create effective sound dampening solutions that elevate your workspace.
Choosing the Right Placement for Your Panels

When placing your acoustic panels, start by identifying high-noise areas in your space.
Next, consider where sound reflections occur, as these spots can amplify unwanted echoes.
Strategically positioning your panels will help you achieve the best sound quality.
Identify High-Noise Areas
How can you effectively reduce noise in your space? Start by identifying high-noise areas where sound tends to bounce around or echo. Focus on locations near hard surfaces like walls, floors, and ceilings. You'll want to place your acoustic panels strategically to absorb sound where it matters most. Here's a quick reference table to help you pinpoint those areas:
| High-Noise Area | Recommended Action |
|---|---|
| Near windows | Install panels on walls |
| Below high ceilings | Hang panels from the ceiling |
| Around workstations | Place panels on walls |
| Close to speakers | Mount panels nearby |
| Entryways | Use panels to block sound |
Consider Sound Reflection Points
After pinpointing high-noise areas, the next step is to evaluate sound reflection points for ideal acoustic panel placement.
Start by identifying surfaces that bounce sound, like walls, ceilings, and large furniture. Stand in your workspace and clap your hands; notice where the sound echoes. These spots are essential for panel placement.
Aim to position panels directly across from reflective surfaces to absorb the sound waves effectively.
Don't forget corners, as they can amplify sound. A common rule is to cover about 20% of the total wall area with panels for best results.
Enhancing Aesthetics With Fabric Choices
Choosing the right fabric for your acoustic panels can greatly enhance the overall look of your space while effectively reducing noise.
Start by considering colors that complement your existing decor. Bold colors can make a statement, while neutral tones can blend seamlessly into the background.
Consider colors that enhance your decor; bold hues create impact, while neutral shades offer a subtle, cohesive look.
Texture also plays a crucial role; a soft, textured fabric can add warmth and depth. You might want to explore patterns that reflect your personality or brand—think stripes, geometric shapes, or even floral designs.
Don't forget about fabric durability; choose materials that resist fading and wear.
Maintenance Tips for Acoustic Panels
Maintaining your acoustic panels is just as important as selecting the right fabric for them.
Regularly check for dust and dirt accumulation, as these can affect their appearance and sound absorption. Use a soft, dry cloth or a vacuum with a brush attachment to gently clean the surface.
If your panels have removable covers, wash them according to the manufacturer's instructions. For stubborn stains, a mild detergent can help—just be sure to spot test first.
Keep panels away from direct sunlight to prevent fading.
Finally, inspect for any signs of damage; if you notice any wear, consider repairing or replacing them to maintain ideal performance.
Your workspace will remain quieter and more inviting with proper care!
Additional Soundproofing Solutions to Consider
If you're looking to enhance your soundproofing efforts, consider a few additional solutions.
Weatherstripping door gaps can help seal out unwanted noise, while soundproof curtains provide an extra layer of insulation.
Installing acoustic ceiling tiles also greatly reduces sound transmission, making your space quieter.
Weatherstripping Door Gaps
While you might've already tackled the walls and windows for soundproofing, don't overlook the importance of sealing door gaps.
These gaps can let noise seep into your workspace, defeating your soundproofing efforts. Here's how to effectively weatherstrip your doors:
- Choose the Right Material: Opt for adhesive-backed foam tape or rubber gaskets that fit your door's dimensions.
- Measure and Cut: Measure the door frame accurately, then cut the weatherstripping to size to guarantee a snug fit.
- Install Securely: Clean the surface, peel off the backing, and firmly press the weatherstripping into place, ensuring a complete seal.
Soundproof Curtains Installation
To further enhance your soundproofing efforts, installing soundproof curtains can be a game changer. These heavy, dense fabrics effectively absorb sound and minimize noise from outside.
Start by measuring your windows to guarantee a proper fit. Choose curtains that extend beyond the window frame; this helps block sound leaks. When hanging, use sturdy curtain rods and brackets for added stability.
Make certain the curtains touch the floor or window sill to maximize their soundproofing capabilities. For best results, layer them with other window treatments if desired.
Acoustic Ceiling Tiles
Acoustic ceiling tiles can greatly enhance your soundproofing efforts, especially in spaces where noise control is essential.
These tiles absorb sound waves and reduce echo, creating a more peaceful environment.
When considering acoustic ceiling tiles, keep the following in mind:
- Material: Look for tiles made from high-density foam or mineral fiber, as they provide better sound absorption.
- Installation: Guarantee proper installation for maximum effectiveness. You can either glue them directly to the ceiling or use a grid system for easy removal.
- Design: Choose tiles that match your workspace aesthetic. Many options are available in various colors and patterns, so you won't sacrifice style for functionality.
Frequently Asked Questions
How Effective Are DIY Acoustic Panels Compared to Professional Ones?
DIY acoustic panels can be quite effective, but they often lack the professional touch in materials and design. You might find them satisfactory for basic sound absorption, though professional panels usually offer superior performance and durability.
Can I Use Recycled Materials for Making Acoustic Panels?
Absolutely, you can use recycled materials for making acoustic panels! Items like old blankets, cardboard, or foam can effectively dampen sound. Just make certain they're dense enough to absorb sound waves for best results. Get creative!
How Long Will My DIY Acoustic Panels Last?
Your DIY acoustic panels can last several years if you use durable materials and maintain them properly. Regularly check for wear and tear, and replace any damaged components to guarantee they continue to perform effectively.
Are There Any Specific Safety Precautions When Building Panels?
When building panels, you should wear safety goggles and a dust mask to protect your eyes and lungs. Always work in a well-ventilated area and keep sharp tools away from your reach when not in use.
Can I Paint My Acoustic Panels Without Affecting Performance?
Yes, you can paint your acoustic panels, but choose low-VOC, water-based paints to minimize any impact on sound absorption. Test a small area first to guarantee the performance isn't compromised before proceeding with the entire panel.